Schedule and Invoke Notebooks as Web Services using Jupyter API
Thanks to serverless cloud services like GCP CloudRunner and Cloud Functions, we don’t need to manage costly virtual machines or servers to deploy our notebooks and execute them periodically. With Jupyter API, you can lift and shift your notebooks to the cloud, turn them into web services and integrate them with scheduling.

However, the most commonly used approach (unless you’re using a cloud-native services like Vertex AI or SageMaker) is to convert notebooks to Python code using nbconvert and adding the code to a freshly bootstrapped Tornado or Flask custom web application.

This includes some coding and external libraries, but the good news is that we can leave our code in our Jupyter development container and trigger it directly from there using the Jupyter Rest API.
Accessing a Notebook over Web API
Before we jump into the details of how to use Jupyter API, I’ll demonstrate how the architecture will work. First, let’s take a simple notebook we can use for testing.
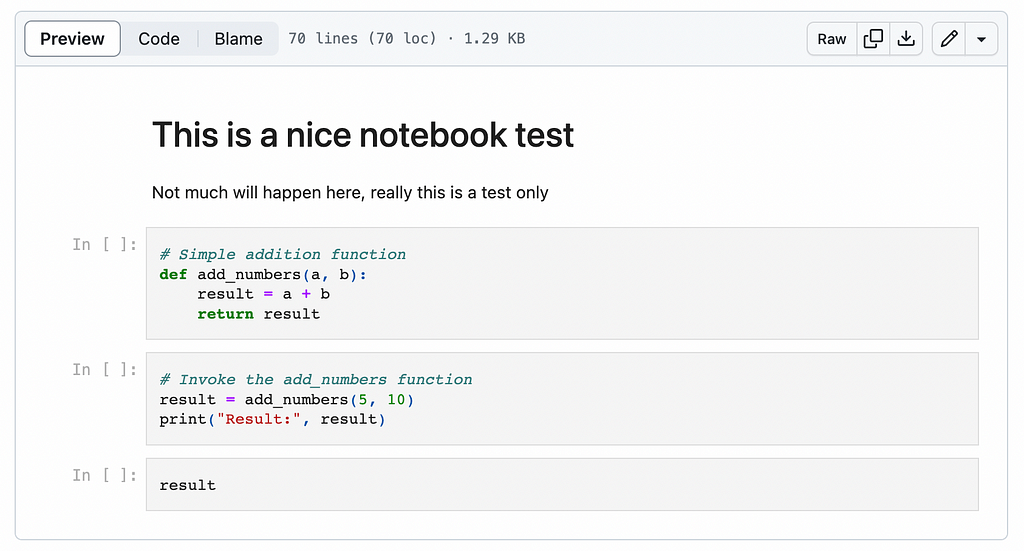
To run it locally using Jupyter, the easiest way is to run it in a Jupyter Lab container:
# download the test workbook
wget https://raw.githubusercontent.com/tfoldi/vizallas/main/notebooks/JupyterAPI_Test.ipynb

# Spawn a new Jupyter lab instance with token auth (and without XSRF)
docker run -it --rm -p 8888:8888
  -e JUPYTER_TOKEN=ab30dd71a2ac8f9abe7160d4d5520d9a19dbdb48abcdabcd
  --name testnb -v "${PWD}":/home/jovyan/work jupyter/base-notebook
  jupyter lab --ServerApp.disable_check_xsrf=true
Once the service starts, you’ll be able to access the notebook at http://127.0.0.1:8888/lab/tree/work using the token passed in the JUPYTER_TOKEN environment variable.
Calling the Notebook from the command line
From the command line, you can download this small script (it requires requests and websocket-client packages) or run it through a Docker container:
# check the IP address of our previously started "testnb" container
docker inspect testnb | grep IPAddress
            "SecondaryIPAddresses": null,
            "IPAddress": "172.17.0.2",
                    "IPAddress": "172.17.0.2",

# Invoke our notebook. Replace the IP below with yours from previous step.
docker run -it --rm
  -e JUPYTER_TOKEN=ab30dd71a2ac8f9abe7160d4d5520d9a19dbdb48abcdabcd
  tfoldi/jupyterapi_nbrunner 172.17.0.2:8888 /work/JupyterAPI_Test.ipynb

Creating a new kernel at http://172.17.0.2:8888/api/kernels
Sending execution requests for each cell
{'data': {'text/plain': '15'}, 'execution_count': 3, 'metadata': {}}
Processing finished. Closing websocket connection
Deleting kernel
This script connects to our newly created JupyterLab server, executes our notebook, returns the last cell’s result, then exits. The entire procedure occurs over web protocols without requiring any modifications to the notebook code or additional libraries.
Under the hood
Unfortunately, there’s no single endpoint in Jupyter API to execute a notebook end-to-end. First, we have to initialize a new kernel (or use an existing one), retrieve the notebook metadata, get all code cells and send an execute_request for each one of them.
To retrieve the results, we need to listen for incoming messages in the WebSocket channel. Since there’s no “end of all code executions” message, we have to manually keep track of how many code blocks we sent for execution and how many of them have actually been completed by counting all messages of type execute_reply. Once everything has finished executing, we can stop the kernel or leave it in an idle stage for future executions.
The following diagram illustrates the complete flow:
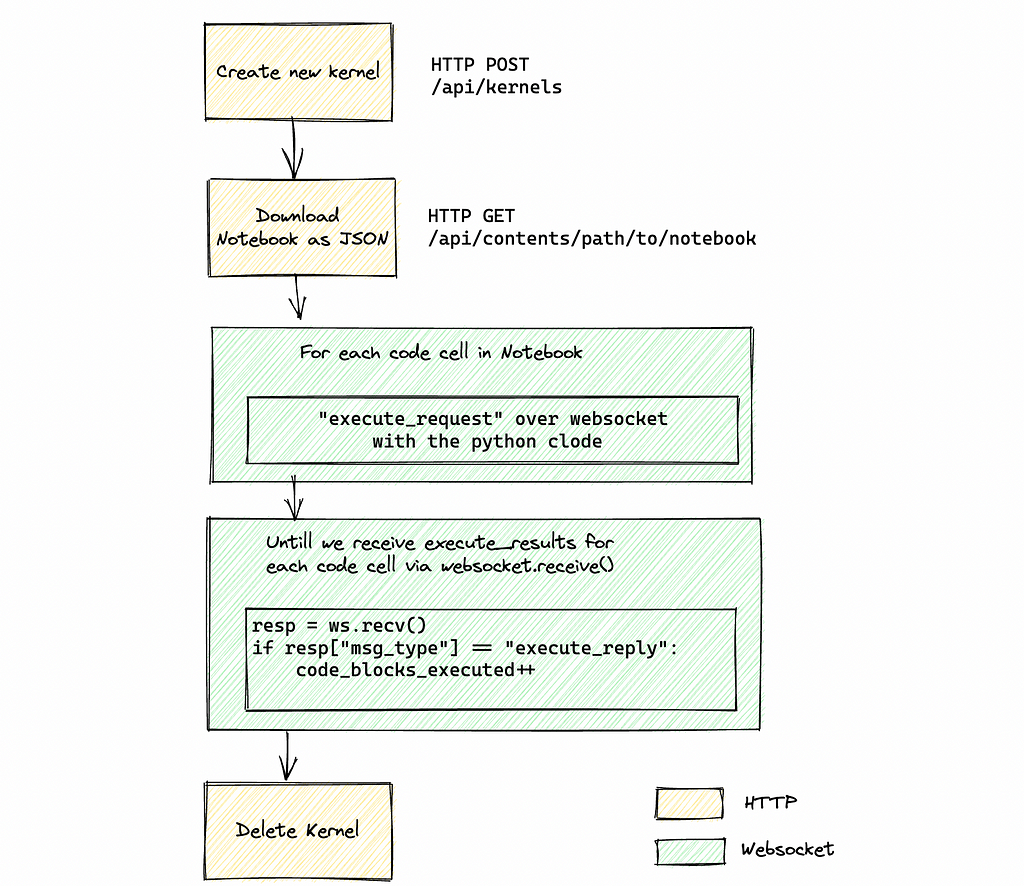
To remain authenticated, we have to pass the Authorization header for all HTTP and WebSocket calls.
If this feels like a somewhat excessive amount of steps just to execute a notebook, I hear you. I’m sure it would be useful to implement a higher-level function inside Jupyter Server to reduce the complexity.
The complete script is here, ready to be used in your applications.
Schedule our workbook on GCP for Free (almost)
While there are many options for hosting a notebook, the most cost-effective way is to leverage Google Cloud’s Cloud Run service. With Cloud Run, you only pay for the exact runtime of your job, making it a cost-efficient choice for infrequently triggered tasks without extra packages or additional SaaS vendors (other than Google) — and, again, without writing a single line of code.
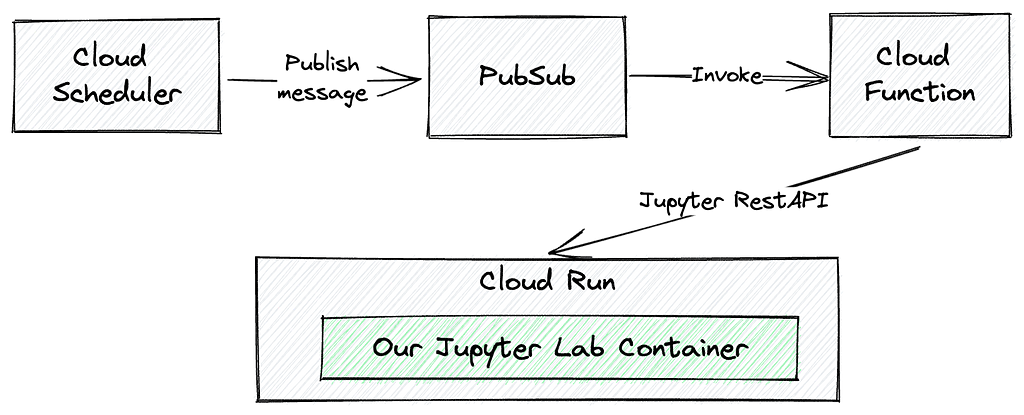
The architecture and invocation flow will look like this:
First, we have to deploy our notebook in GCP Cloud Run. There are multiple ways to add a file to a Cloud Run service, but perhaps the easiest one is to copy our notebooks to a Docker container.
# Simple dockerfile to host notebooks on a Jupyter Server
FROM jupyter/base-notebook
COPY JupyterAPI_Test.ipynb /home/jovyan/workspaces/
To build and make the container available in Cloud Run, we can simply specify the –source option with gcloud run deploy, pointing it to a directory where our notebooks and Dockerfile are located.
# get the source code of the Jupyter notebook and the Dockerfile
git clone https://github.com/tfoldi/jupyterapi_nbrunner.git

# Deploy the test notebook in a jupyter/base-notebook container
# The Dockerfile and JupyterAPI_Test.ipynb files in the tests/test_notebook
# folder
gcloud run deploy test-notebook --region europe-west3 --platform managed
  --allow-unauthenticated --port=8888
  --source tests/test_notebook
  --set-env-vars=JUPYTER_TOKEN=ab30dd71a2ac8f9abe7160d4d5520d9a19dbdb48abcdabcd

[...]
Service [test-notebook] revision [test-notebook-00001-mef] has been deployed and is serving 100 percent of traffic.
Service URL: https://test-notebook-fcaopesrva-ey.a.run.app
JupyterLab will be available at the Service URL. Google Cloud Run will provide the SSL certificates and the mechanisms to start or suspend the container depending on requests hitting the deployment.
To trigger our newly deployed notebook from the Cloud Scheduler, we have to create a Cloud Function tied to a PubSub topic. The following command will deploy main.py and requirements.txt from this repository. The main.py is the same script we used previously to trigger our code from the command line.
# make sure you are in the same directory where you cloned the
# contents of https://github.com/tfoldi/jupyterapi_nbrunner.git

gcloud functions deploy nbtrigger --entry-point main --runtime python311
  --trigger-resource t_nbtrigger --trigger-event google.pubsub.topic.publish
  --timeout 540s --region europe-west3
  --set-env-vars=JUPYTER_TOKEN=ab30dd71a2ac8f9abe7160d4d5520d9a19dbdb48abcdabcd
Let’s test our new Cloud Function by sending a message to the t_nbtrigger topic with the appropriate parameters, just like we did in the command line:
gcloud pubsub topics publish t_nbtrigger
  --message="test-notebook-fcaopesrva-ey.a.run.app:443
       /workspaces/JupyterAPI_Test.ipynb --use-https"
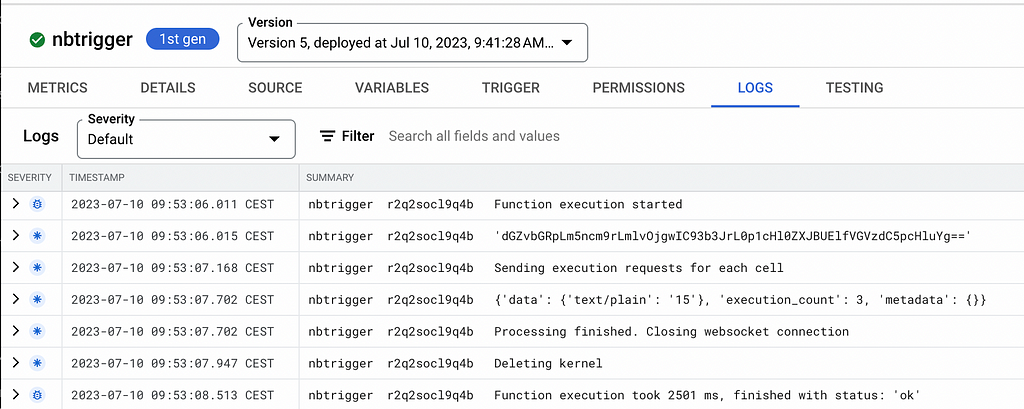
If you check the nbtrigger Cloud Function’s logs, you may notice that emitting a record to the topic successfully triggered the execution of the notebook we specified:
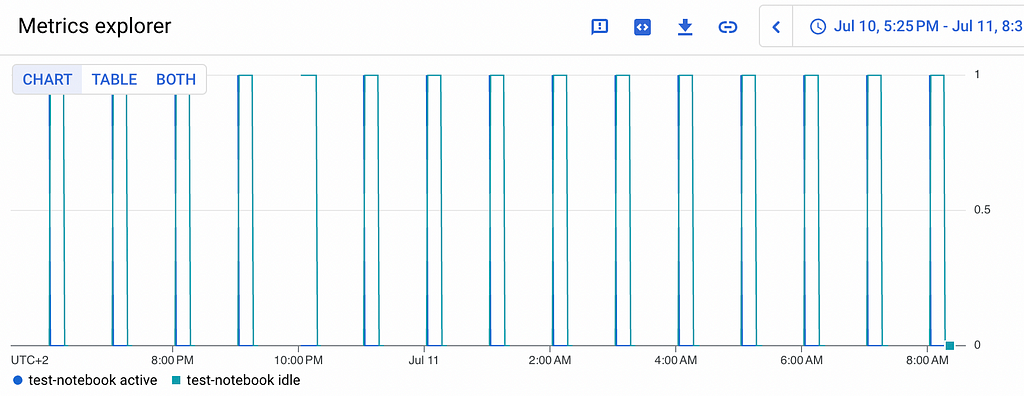
The final step is to create a schedule that runs at specified times. In this case, we are about to run our notebook every hour:
gcloud scheduler jobs create pubsub j_hourly_nbtrigger
  --schedule "0 * * * *" --topic t_nbtrigger --location europe-west3
  --message-body "test-notebook-fcaopesrva-ey.a.run.app:443 /workspaces/JupyterAPI_Test.ipynb --use-https --verbose"
You’re all set — you just scheduled your first Jupyter Notebook in a serverless way.
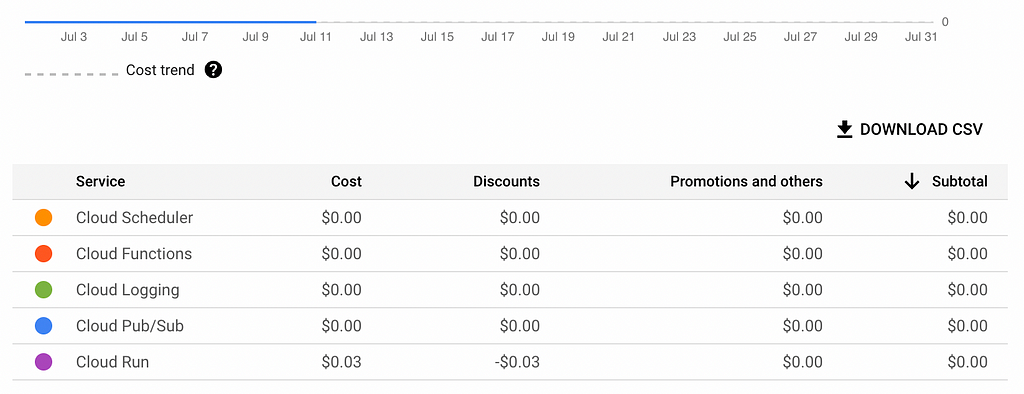
Our Notebook will consume only a few cents per day, making this deployment method one of the most cost-effective in Google Cloud.
Conclusion
We used to rely on converting our Jupyter Notebooks to Python code to make them available to cloud-native tools, or on more complex and expensive services like Vertex AI or SageMaker. However, by utilizing the Jupyter Rest API and deploying your Notebooks along with its “development environment,” you can skip the extra steps and enable web service calls or scheduling for your Notebooks.
While this approach is not necessarily appropriate for large-scale projects with compute-heavy long-running notebooks, it is perfectly fine for your home automation or hobby projects — without (over)spending on infrastructure.
Schedule and Invoke Notebooks as Web Services using Jupyter API was originally published in Towards Data Science on Medium, where people are continuing the conversation by highlighting and responding to this story.